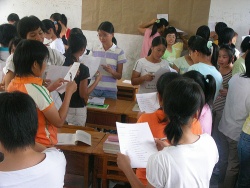
Klassenspaziergang


Klassenspaziergang

Bild zur Methode Klassenspaziergang

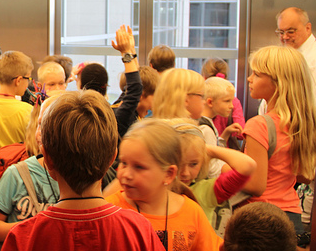
Foto von Frank Tempel (abgerufen am 26.10.2012)

Kurzbeschreibung

Eine Kennenlernmethode, die durch ein vorgegebenes Thema geleitet wird.

Ablauf

  1. Alle Kursteilnehmer/innen (TN) bekommen einen Auftrag (z.B. über ihr Heimatland zu berichten) oder zu unterschiedliche Fragen zu einem übergeordneten Thema (beim Thema Bildung z.B.: Wie funktioniert das Bildungssystem in deiner Heimat? Gibt es so eine Art Bafög bei euch? In wie vielen Klassen macht man das Abitur? etc.)

  2. Die TN bekommen Zeit (z.B. 15 Minuten), mit möglichst vielen anderen zu sprechen.

  3. Wenn sich die TN zu unterschiedlichen Teilaspekten befragt haben, sollten danach die Gesprächsergebnisse präsentiert werden. So kann der/die Kursleiter/in fragen, ob jemand etwas besonders Überraschendes erfahren hat. Alternativ kann jeder die für ihn interessanteste Information auf ein Plakat schreiben.

Benötigte Tools und Materialien

Gespräch

  • im Raum

  • Online: im Virtuellen Klassenzimmer, im Forum, im Chat

Präsentation der Informationen

  • Wandplakat

  • Online: Kooperatives Textsystem

Kommentare

Die Fragen könnten auch in Form eines Leittextes formuliert werden. Dieser könnte auf Papier den TN gegeben werden, um damit eine Orientierung für die Gespräche zu haben.

Learning by teaching


Learning by teaching

Picture for Learning by teaching

Photo by Rex Pe (retrieved on 21.11.2009)

Short description

Learning by teaching is an activity-oriented teaching method, where pupils or students learn by teaching the material to each other. It can be used for any subject, school type, or age. Although the term is sometimes used to refer to situations where pupils from higher grades teach younger pupils, the term "Learning by Teaching" established itself in the educational profession as mutual teaching within a classroom. In Germany, learning through teaching in its modern form is linked to Jean-Pol Martin, who developed its overall pedagogical concept and disseminated it through his network of contacts.[1]

Process description

Learners or learning groups are assigned a topic. They have fixed time to collect and process the materials in order to prepare passing the acquired knowledge to other learners.

Required resources

Any possibility can be used. If the knowledge is gathered and organised on a computer, learners must have editing privileges when using, for example, a wiki or an LMS. They also need to posses sufficient technical competence not to be distracted by operational issues but focus on the main learning objective.

Examples

The demo course shows learning units which have been created by trainees (partly as a group) and subsequently completed by all participants of a course under the guidance of the "teachers".[2] Please click on "Demo" when the page opens, then continue to "Apprentices: Seminars".

Comments

In the LMS "sudile," the co-authors function exists to support this method. The author of a course can create any number of "empty" units and assign students authoring rights. Once the course is loaded into the system, those units become available to all course participants. See the detailed article about the learning platform sudile.[3]

Lecture


Lecture

Picture for Lecture

Image by mikebaird (Access: 27.10.2012)

Short description

Lectures can be both face-to-face lecturers in the classroom as well as realtime or recorded video- and audiolectures. Lectures are usually justified by the need to teach specific facts and basic skills or having other specific learning targets. Lecture requires well-developed content. One of the advantages of choosing lecture as a teaching method is certainly the possibility to share lecturer"s personal experience and inspire the students for further activities and explorations. In the same time the lecture - especially in the case of large classrooms - is a one-way communication with few possibilities for active participation from the students.

PSI: https://psi.methopedia.eu/learning-activity/lecture

Letter to myself


Letter to myself

Picture for Letter to myself

`Image by Pingu1963 (Access: 28.09.2009) 1

System Message: WARNING/2 (<string>, line 7); backlink

Inline interpreted text or phrase reference start-string without end-string.

Short description

At the end of a course, participants write a letter to themselves which the the facilitator sends out after a certain interval to remind the participants of their ideas and intentions.

Process description

  1. The facilitator hands out paper, envelopes and pens to all participants.

  2. She explains the process.

  3. The participants now write a letter to themselves where they summarize what they have learned, what they want to implement and how.

  4. Participants put postage on the envelope and write their address on it.

  5. The facilitator collects the letters and sends them to the participants after a certain interval, e.g. four weeks.

Required resources

  • Paper for each participant

  • Envelopes for each participant

  • Stamps

  • Pens

Examples

Sample questions:

  • Thoughts about my goals and aspirations

  • What I want to accomplish this year

  • How can I reach these goals?

Comments

This letter is meant for a final reflection of the event. Participants can take stock of the course. It also serves as a reminder when the memory of the event and its activities and suggestions has faded or been forgotten.

PSI: https://psi.methopedia.eu/learning-activity/letter-to-myself

1

not accessabel anymore, checked at 16.04.2017

Mindmapping


Mindmapping

Picture for Mindmapping

Image by Kaeru (Access: 30.09.2009)

Short description

Mind-Mapping is a way of visualizing relationships. A concept forms the centre of a mindmap. Subconcepts are represented as branches which can have subbranches in return.

Process description

  1. Start with writing your central concept in the middle of an empty sheet of paper.

  2. Think of different aspects of the topic and construct the mind map.

  3. In order to organise your concepts, create higher level concepts to order the different aspects.

  4. Revise and annotate your mindmap so that you will be able to understand it later.

Required resources

  • Flipchart

  • Big sheet of paper

  • Coloured pens or mind mapping software

Comments

The basic idea is in the centre and can be quickly understood. The graphic representation supports the brainstorming and thinking process. A short glance at the mind map suffices to grasp the most important points.

PSI: https://psi.methopedia.eu/learning-activity/mindmapping

Mini-case studies


Mini-case studies

Picture for Mini-case studies

Image by Let Ideas Compete (Access: 12.11.2009)

Short description

Case studies provide relevant, meaningful experiences in which learners can discover and abstract useful concepts and principles. In mini-case studies you can provide realistic, real-world experience by presenting a series of concise but complete examples.

Process description

  1. Start with a statement of the situation.

  2. Introduce any characters, objects, or organization of importance.

  3. Spell out crucial relationship among them.

  4. Alternate questions and answers about the situation.

  5. Questions should require the learner to carefully examine the situation, infer facts not stated, apply principles, and deduce conclusions.

  6. Pose some additional questions to learners.

  7. Learners should post their answers in the discussion forum.

Required resources

access to a discussion forum

Comments

Learners can also make up their own mini-case studies and submit them to a discussion forum so that other learners could comment on the ideas.

Activity description was prepared on the basis of W. Horton's "E-learning by design".

PSI: https://psi.methopedia.eu/learning-activity/mini-case

Mnemonics


Mnemonics

Picture for Mnemonics

Photo by moose.boy (retrieved on 07.11.2009)

Short description

Using mnemonics, people develop devices (mnemonic tricks), such as rhymes, formulas, sketches, or special words or sentences. The principle of mnemonics is to associate hard to memorise information with simpler representation.

Process description

We choose a specific topic, which has particularly difficult to remember content. We choose an appropriate mnemonic device (system/method). The terms to be remembered are expressed in simpler terms, according to the selected mnemonic device. They are repeated until all terms are properly learned by heart.

Required resources

Nothing special

Examples

Memorising with the help of a walk:

  1. Write the information to be learned on a notepad.

  2. Imagine walking (a specific route) and stopping at certain locations (for example, on a street, at a bus stop, by a lake, by a distinctive tree) and by each memorise one of the items from the notepad.

  3. Note in the notepad which content is associated with which place.

  4. Keep repeating the walk on that route until you have mastered the subject.

During an examination, you just need to imagine going on that walk to recall with relative ease what was learned.

See also:

Comments

Mnemonics doesn't only help memorising complicated processes faster and remembering them longer. The fact that you need to limit yourself to certain keywords, when using this learning technique, and that these keywords must be itemised in a specific format helps to structure the entire topic. Those who must constrain themselves exclusively to the important keywords in order to learn successfully will certainly let the "useless knowledge" go. Thus, although the mnemonics technique is primarily intended as a memorising and learning aid, it can also lead to pushing the extraneous, secondary information to the background and free the mind for the essential knowledge.

PSI: https://psi.methopedia.eu/learning-activity/mnemonics

Note cards


Note cards

Picture for Note cards

Image by Andy Ciordia (Access: 30.09.2009)

Short description

A method to learn facts, concepts or vocabulary by heart.

Process description

Basic Procedure

  1. Take a card

  2. Read it

  3. Think of a response

  4. Turn the card and check your response

  5. Put the card away

Sorting method

  1. First, all cards are in the first compartment.

  2. If you have answered a question correctly, put it in the next compartment.

  3. When the first compartment has been emptied, start on the second one.

  4. If you answer correctly, move the card to the third if not, move it back to the first.

Required resources

Note cards and a box with dividers. Questions can also be assembled electronically and printed with the computer.

Comments

This way of learning is very systematic and is more suitable for memorizing than for learning new material.

PSI: https://psi.methopedia.eu/learning-activity/record-cards

One-sentence summary


One-sentence summary

Picture for One-sentence summary

Image by NLanja (Access: 11.04.2011)

Short description

One-sentence sumaries are framed activities that can clearly indicate to teachers the level of there students' understandings. They prompt students to actively angage with the text in order to complete the brief exercise.

Process description

  1. Students summarize knowledge of a topic by constructing a single sentence that answers the questions "Who does what to whom, when, where, how, and why?"

  2. The purpose is to require students to select only the defining features of an idea.

  3. Evaluate the quality of each summary quickly and holistically.

  4. Note whether students have identified the essential concepts of the class topic and their interrelationships.

  5. Share your observations with your students.

PSI: https://psi.methopedia.eu/learning-activity/one-sentence-summary

Open space


Open space

Picture for Open space

Image by Pandiyan (Access: 30.09.2009)

Short description

Open Space is a method for large groups where 20 to 1000 people collaborate to work on a topic or find a solution for a problem.

Process description

  1. At the beginning all participants are sitting in a circle. The facilitator “opens the space” and introduces the procedure.

  2. Content and organisation emerge from the interests and topics of the participants. Everybody can make a contribution. It should be a topic or task with some urgency. Someone should be willing to take the responsibility.

  3. Issues are assigned to the available work rooms and time slots on a large paper-covered wall.

  4. During the market phase, starting times and rooms are negotiated and participants sign up to rooms according to their interest in the topics.

  5. Group work: Participants self-organise their work, guided by the law of two feet (see below). The group organisers are asked to document the results of the group work in order to make it available to other participants.

  6. Morning and evening news

  7. Evaluation and implementation planning

  8. Final round (often with a ritual where the speaker holds up a rod)

  9. „Closing the room“

Required resources

Space for documentation

Comments

The success of an open space conference depends on the implementation of the ideas that were generated. Often the participants are highly motivated such that a powerful momentum is generated and numerous activities initiated. However, the implementation should be supported and supervised. The facilitators are responsible for that. They need to circulate and determine which project needs which form of support.

The law of two feet: If at any time during our time together you find yourself in any situation where you are neither learning nor contributing, use your two feet. Go to some other place where you may learn and contribute.

Reflection

  1. Do we have one headline at the beginning or what is the reason to come together?

  2. Are the processes limited in time or participants?

  3. Is the duration limited: possible over serveral days, weeks, month?

  4. Should one use templates for the results and their documentation?

(Margit Scholl)

PSI: https://psi.methopedia.eu/learning-activity/openspace